

Using self-tanner to even out vitiligo with natural-looking results
A sunless tan may soften the contrast of vitiligo, but it may not develop evenly across every patch. Using self-tanner to even out vitiligo can create a more blended appearance, since depigmented areas may respond differently from surrounding skin.
It’s understandable to want a natural-looking result without disrupting your routine or getting product on your clothes. Careful application can help: blend each patch’s edges, let the product dry before dressing, and avoid water for the period stated in its instructions.
This guide explains how to choose and apply self-tanner for a more even result, what to expect as the color develops, and how to plan for drying and water avoidance. It also explains why self-tanner does not protect against ultraviolet exposure, so sunscreen remains important outdoors.
Key Takeaways
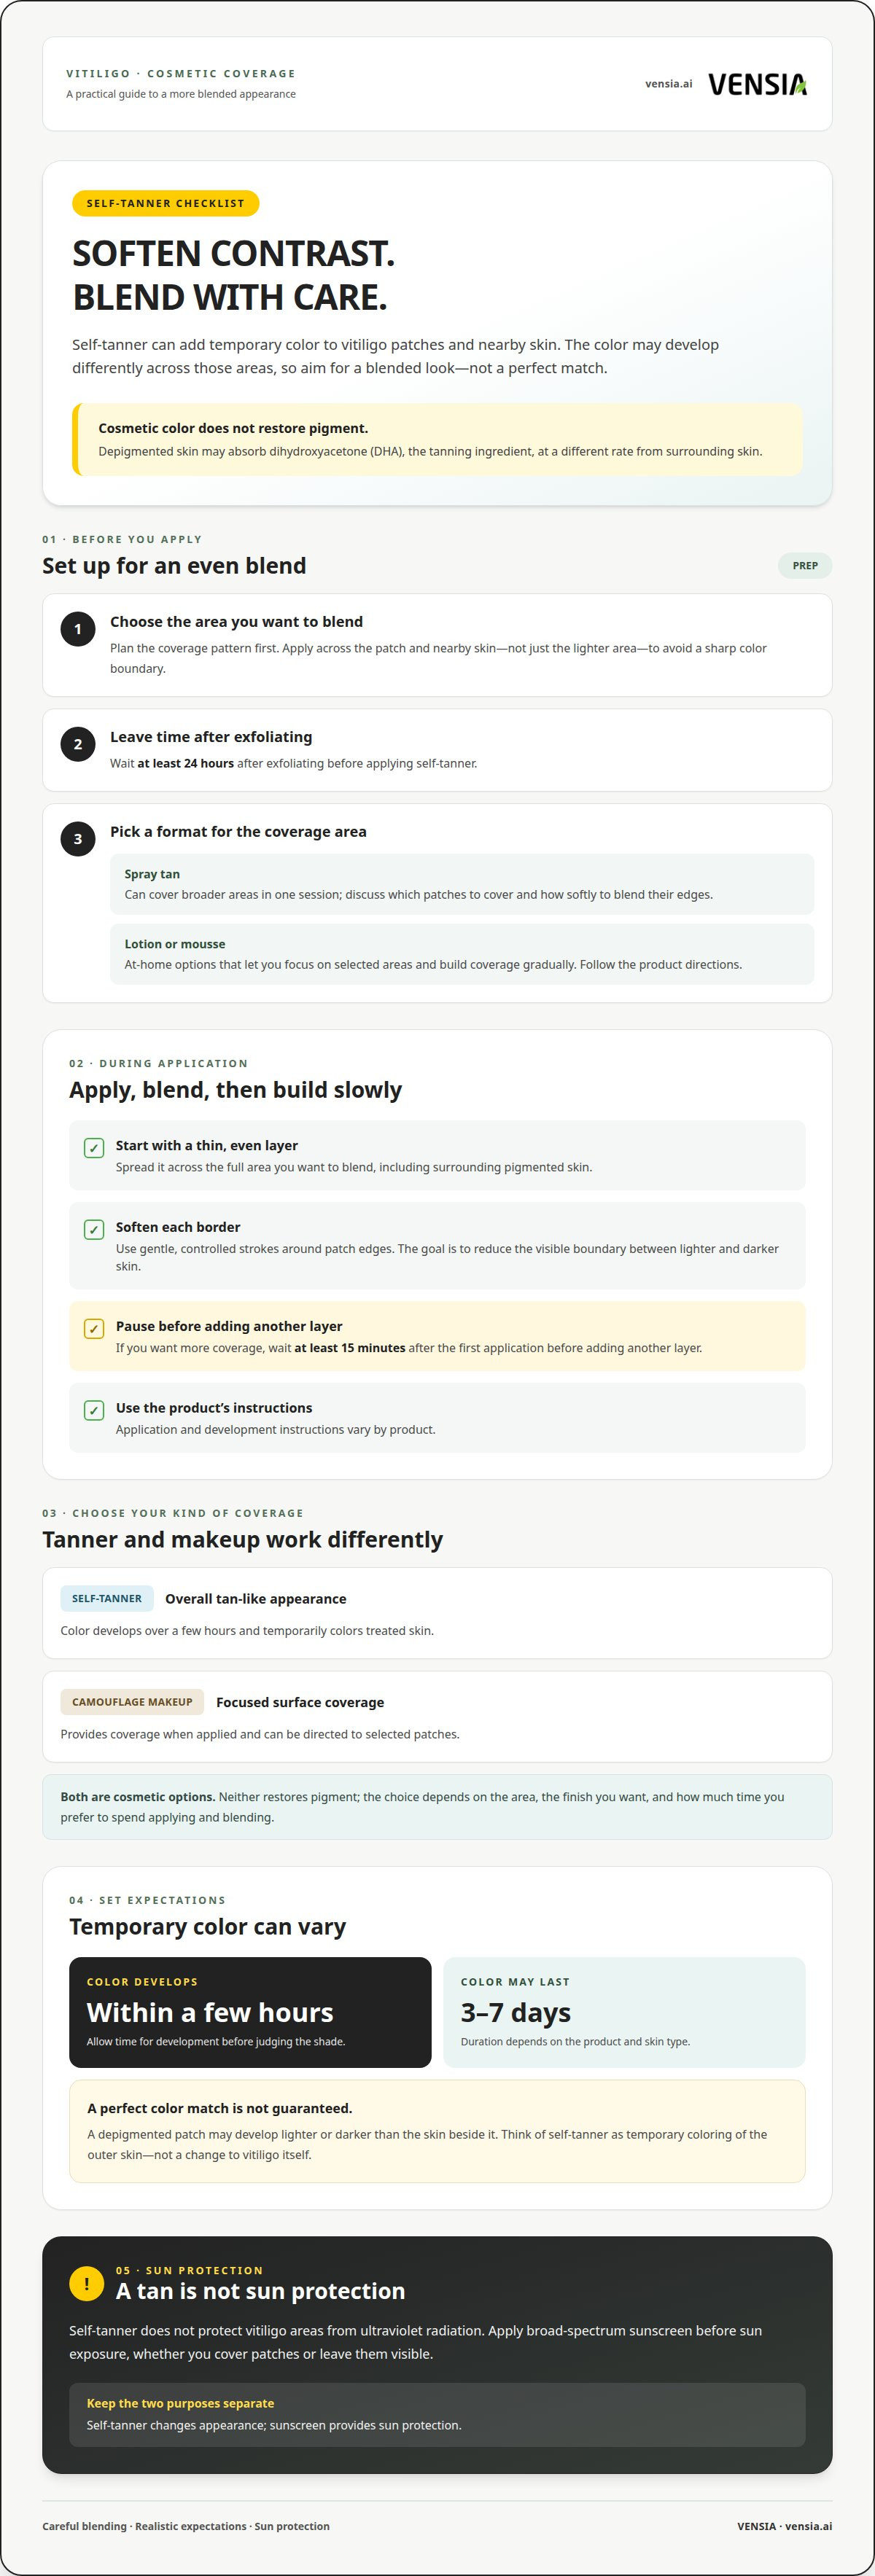
- Wait at least 24 hours after exfoliating before applying self-tanner to help avoid uneven-looking results.
- If you need another layer for more coverage, allow at least 15 minutes after the first application before adding it.
- Choose between a spray tan, lotion, or mousse based on the areas you want to cover and the finish you prefer.
- Self-tanner offers temporary cosmetic coverage; consider VENSIA Anti Vitiligo Cream as a separate skincare option for vitiligo-focused care.
Self-tanner and vitiligo: what precautions should you take?
Self-tanner can soften the contrast between vitiligo patches and surrounding skin, but the color may develop unevenly. Careful blending, realistic expectations, and sun protection make cosmetic coverage more considered.
Applying Tanner to Patches and Surrounding Skin
Applying self-tanner means spreading the product across depigmented patches and nearby pigmented skin, then blending their borders. This matters because vitiligo areas may absorb dihydroxyacetone, the tanning ingredient, at a different rate. Start with an even, thin application over the full area rather than coating only the lighter patch. Use gentle, controlled strokes around each edge to soften the boundary. If you exfoliate first, wait at least 24 hours before applying tanner. If coverage needs building, wait at least 15 minutes before adding another layer.
Temporary Skin Coloring
Self-tanner temporarily colors the outer skin, creating a tan-like appearance without restoring pigment. Color usually develops within a few hours and may last between three and seven days, depending on the product and skin type. Depigmented areas may develop differently, so the result can vary in shade rather than appear perfectly uniform. A patch, for example, may look lighter or darker than the skin beside it. Treat the color as temporary cosmetic coverage, not a change to vitiligo itself.
Tanner and Cosmetic Camouflage Makeup
Self-tanner and cosmetic camouflage makeup both change the visible contrast of vitiligo, but they work differently. Tanner develops over a few hours and temporarily colors treated skin; makeup provides surface coverage when applied. Self-tanner may suit someone seeking an overall tan-like appearance, while makeup allows focused coverage on selected patches. Neither restores pigment. The right option depends on the area, the finish you want, and how much time you prefer to spend applying and blending.
Covering skin may feel reassuring for one occasion and tiring at another. You might choose tanner for a social event, then prefer bare skin at home. That choice can change with your mood, clothing, or setting. There is no need to cover every patch, and cosmetic coverage does not define how you should feel about your appearance.
Embracing your skin with vitiligo can mean showing your patches, using tanner, or choosing differently from day to day. You might leave your hands uncovered while blending a patch on your legs. Self-expression is flexible; choosing coverage does not cancel acceptance of your natural skin.
Depigmented skin still needs protection from ultraviolet radiation. Self-tanner does not provide that protection, so apply broad-spectrum sunscreen before sun exposure. Keep sun protection separate from cosmetic blending: an even-looking tan is no substitute for sunscreen, whether you cover patches or leave them visible.
Using spray tans and self-tanner to cover vitiligo
Spray tans and at-home self-tanners can add temporary color to depigmented patches and nearby skin. The aim is to reduce visible contrast, not restore pigment. A spray-tan practitioner can tailor the application to your skin pattern and coverage goals. That matters because one broad application may not suit both a small hand patch and larger areas across the body.
With a spray tan, product is distributed across selected areas, including the surrounding skin. Before an appointment, decide which patches you want covered and how softly you want their edges blended. If you want to cover patches on both arms, for example, you may prefer color across the full arms rather than isolated spots. Clear goals help guide the application pattern. The final shade can still vary because depigmented skin may respond differently from pigmented skin.
At-home lotion or mousse gives you control over where you apply color and how you build coverage. Work across the whole area you want to blend, rather than applying product only to white patches. Use deliberate, even strokes and soften the borders where lighter and darker skin meet. A small patch near your wrist, for instance, may need careful blending into the surrounding forearm. Follow the product’s directions for application and development time.
Choose a format based on the area and the level of control you want. A spray tan can cover broader areas in one session, while lotion or mousse lets you focus on specific areas at home. Neither guarantees a perfect color match. The result depends on the contrast between the patch and nearby skin, the application pattern, and how each area develops. Build coverage gradually rather than expecting one heavy layer to erase every difference.
Plan for the color to be temporary. Self-tanner camouflage may last from three to nine days, so your appearance can change as the color fades. If you’re preparing for an event, give the color time to develop before deciding whether to add coverage. Avoid a last-minute, heavy application across a large area; an uneven layer can make shade differences more noticeable.
Use sun protection separately from tanning coverage. Self-tanner does not protect vitiligo areas from ultraviolet radiation, so apply broad-spectrum sunscreen before sun exposure. If you wear a spray tan outdoors, for example, you still need sunscreen on exposed skin. Treat cosmetic color as an appearance choice, not a substitute for protection. This distinction helps you plan coverage while keeping depigmented areas protected from the sun.
Applying self-tanning mousse
Self-tanning mousse adds temporary color to selected skin, but vitiligo patches may develop differently from surrounding areas. A mousse tutorial shows the developed result after six hours, so allow time before judging the shade. The goal is a blended appearance, not identical color on every patch.
Prepare the area deliberately. If you’re treating a patch on your forearm, for example, include the surrounding skin so the color does not stop at a sharp border. Follow the mousse’s product directions, since formulas and development instructions vary.
- Choose the area. Decide whether you’re covering one patch or a broader region, such as both lower legs. This sets a clear boundary for applying and blending.
- Dispense a manageable amount. Start with enough mousse for a small section, such as one forearm. Working in smaller areas makes it easier to notice missed spots before moving on.
- Spread the mousse evenly. Use smooth, overlapping strokes across the patch and adjacent skin. Avoid leaving a dense stripe directly on the patch edge.
- Blend the border. Soften the transition with light strokes into the surrounding skin. On a patch near the wrist, blend toward the forearm rather than ending abruptly at the boundary.
- Review the coverage. Check the treated area under consistent lighting, including its edges and nearby skin. A mirror can help reveal a missed strip on the back of an arm.
- Follow the label. Use the mousse’s stated development and aftercare directions. Don’t assume every formula develops at the same pace.
Patience matters when tanning. A mousse result shown after six hours illustrates why an immediate glance may not reflect the developed color. Wait for the product’s stated development period before deciding whether to adjust the shade. Applying more while the first layer is still developing can make the final appearance harder to assess.
Consider placement, too. If a patch crosses from your hand onto your wrist, treat the visible area as one blending zone rather than two separate spots. For a larger patch on your leg, work across the full area and soften its edges. This helps keep the application pattern consistent.
Keep your expectations focused on temporary cosmetic coverage. Mousse changes visible skin tone; it does not restore pigment or make every area develop identically. Gradual, even application and careful blending around patch edges can help you assess the finish calmly. Keep broad-spectrum sunscreen in your outdoor routine, because self-tanner does not protect skin from ultraviolet radiation.
Choosing a natural-looking tanner
A natural-looking result depends on the shade, the area you’re covering, and how evenly the color develops. Self-tanner may develop differently across vitiligo patches and surrounding skin, so an identical tone cannot be guaranteed. Start by deciding whether you want subtle blending or a deeper overall tan. That goal can guide your choice of format and application coverage.
First consider the size and location of the area. Lotion or mousse can give you control over a hand patch, while a spray tan may suit broader areas. If you’re blending patches across both arms, for example, you may prefer coverage over each full arm. Coloring only the lighter spots can leave noticeable borders, especially if the color develops differently there.
Use the surrounding skin as your reference when choosing a shade. If you want to soften contrast on your forearm, aim for a tone that works with nearby skin rather than choosing the darkest option for maximum coverage. A deeper shade does not necessarily create a closer match. The patch and adjacent skin may respond differently, so focus on the overall appearance rather than expecting the same color everywhere.
- Match the format to the area. Choose mousse or lotion for controlled, localized application; consider a spray tan for broader coverage.
- Set a clear color goal. Decide whether you want a light blend or a more noticeable tan before applying.
- Plan the coverage boundary. Include surrounding skin around a patch on the wrist, arm, or leg to avoid an abrupt edge.
- Follow product directions. Use the stated application and development instructions, since tanning products can differ.
Before covering a large area, test the product on a small, less visible section and observe the developed color. This gives you a practical preview of how the formula looks on your skin. Testing near your lower leg, for example, can help you judge whether the shade works with nearby skin before applying it across both legs. Wait for the product’s stated development period before assessing the result.
Consider how the color will fit your plans. A tan may appear within a few hours, and its duration varies with the product and skin type. If you’re preparing for an event, don’t choose a shade based only on how it looks immediately after application. Assess the developed color first, then decide whether the tone and coverage suit your preference.
Keep appearance and sun protection separate. Self-tanner does not protect skin from ultraviolet radiation, including depigmented patches. Broad-spectrum sunscreen remains necessary before sun exposure, whether you choose lotion, mousse, or a spray tan. A natural-looking shade is a cosmetic choice, not a measure of protection.
Drying and water-avoidance times
Allow self-tanner to dry before getting dressed. Then keep treated spots away from water for 3 hours. These are separate stages: drying helps prevent immediate transfer onto clothing, while the water-free period protects the developing result. Plan both before applying, especially if the treated area sits beneath sleeves or trousers.
For example, applying tanner to your legs just before getting dressed can create friction while the product is drying. Instead, leave the area uncovered for the full 15 minutes, then choose loose clothing that won’t rub against the skin. Drying time can vary by product and application amount, so follow the product label as well. A reported routine describes the tanner drying in another five minutes or less, but that experience doesn’t replace the 15-minute guidance.
Water avoidance takes longer than the initial drying period. Keep showers, handwashing over treated spots, rain, and swimming in mind during the 3-hour window. If you’ve applied tanner to your hands, washing them too soon may interrupt the color development there. If you’ve treated your legs, plan bathing before application or after the waiting period. The key is to keep water off the treated skin for the stated time.
Use this sequence to fit application into your day:
- Choose your timing. Pick a period when you can leave the treated skin undisturbed for 15 minutes and avoid water for 3 hours.
- Apply the product. Cover the intended area evenly and blend the edges of vitiligo patches.
- Let it dry. Wait 15 minutes before dressing, and avoid tight clothing that presses against the area.
- Keep skin dry. Avoid water on treated spots for 3 hours after application.
- Assess later. Let the color develop before deciding whether the coverage needs adjustment.
Plan around everyday interruptions, too. A morning application may be difficult if you need to shower, wash your hands, or get dressed quickly. An evening application may be easier if you can leave the treated area uncovered and dry. If you’ve tanned your hands, for instance, plan around handwashing, and avoid applying product just before a swim. Timing application carefully reduces the chance of water reaching a patch too soon.
Dry skin and developing color do not mean your skin is protected from the sun. Self-tanner does not protect depigmented skin from ultraviolet radiation, so apply broad-spectrum sunscreen before sun exposure. Keep sunscreen separate from the initial drying and water-avoidance plan: wait times help the cosmetic result, while sunscreen addresses outdoor exposure. Follow the tanner’s label for product-specific instructions.
VENSIA: VENSIA Anti Vitiligo Cream
VENSIA Anti-Vitiligo Scar Removal Cream is a skincare option for readers seeking vitiligo-focused care alongside temporary cosmetic coverage. Self-tanner changes the visible tone of skin, while VENSIA Anti-Vitiligo Scar Removal Cream offers a separate option for a targeted skincare routine. Keeping those purposes distinct can help you choose what fits your priorities, whether you want a temporary blended appearance, vitiligo-focused skincare, or both.
For readers also concerned about dark spots or uneven tone, VENSIA Anti-Pigmentation Cream is another targeted skincare option. Choose based on the concern you want to address, rather than treating self-tanner and skincare products as interchangeable.
If you’d like to learn more about VENSIA Anti Vitiligo Cream, contact VENSIA.
Choose the approach that feels right for you
Using self-tanner to even out vitiligo can be one part of your personal skincare routine, not a requirement. You can choose cosmetic coverage for a particular occasion, use it regularly, or leave your skin uncovered. Let your comfort, the areas you want to cover, and the time you can give to application guide your choice.
Your next step may be deciding what you want from skincare beyond temporary color. VENSIA offers targeted creams and a moisturizing body lotion for different skin concerns. Keep your goals clear: cosmetic tanning changes visible tone, while skincare products serve a separate role in your routine.
If you’d like to explore a skincare option that fits your concerns, contact VENSIA for personalized support. A considered routine can leave room for both practical choices and confidence in your natural skin.
Frequently Asked Questions
Vitiligo: can a sunless tanner mask depigmented areas?
Yes. Sunless tanner can add temporary color that reduces the contrast of depigmented areas. It will not restore pigment or change vitiligo itself, and patches may develop a different shade from surrounding skin. A patch visible above a shirt collar, for example, may blend more softly after tanning but remain noticeable in bright daylight. Think of the result as cosmetic coverage, not a permanent change.
Can self-tanner help even out the appearance of vitiligo?
Yes, using self-tanner to even out vitiligo can soften the visual difference between patches and surrounding skin. The finish depends on how the color develops across each area, so a fully uniform tone is not guaranteed. If you’re preparing for a photo or gathering, consider how the color looks in that setting’s lighting. Some people prefer subtle blending, while others choose to leave their patches visible; either choice is personal.
Which self-tanning products work best for vitiligo patches?
No single format works best for everyone. Lotion or mousse may suit a small, specific area because you can apply the product directly and blend around it. A spray tan may be practical for broader coverage, with the application tailored to your skin pattern and goals. A small patch on one arm, for example, calls for different coverage planning than patches across several areas.
How to apply self-tanner evenly to vitiligo-affected skin?
Apply color across the area you want to blend, not just the pale patch. For a patch near your knuckles, cover the surrounding part of your hand as well, using light strokes near the edges. Follow the product directions and assess the developed shade before adding coverage. This lets you judge the transition in the same area rather than comparing it with a different part of your body.
How long does self-tanner last on vitiligo patches?
Camouflage color may last from three to nine days; a general estimate for self-tanner is three to seven days. The product and your skin type affect how long the color remains, and patches may appear to fade at a different rate from nearby skin. The contrast may become more visible again as the tan fades, for example. Plan for gradual change rather than assuming the shade will stay constant.
Can self-tanner irritate or worsen vitiligo?
Self-tanner provides cosmetic color, not treatment for vitiligo. Skin can respond differently to products, so follow the specific label and do not use a product contrary to its directions. If you notice an unwanted skin reaction, stop using it. Keep the distinction clear: a color difference after tanning concerns appearance, while the tanner is not designed to address changes in vitiligo itself.
Is DHA self-tanner safe for people with vitiligo?
DHA in self-tanner can temporarily color skin, but depigmented patches may absorb it differently from pigmented areas. This can affect the shade, but it does not establish how an individual will respond to a particular formula. Read the product’s directions and warnings before use. If its instructions do not suit your skin or intended use, do not apply it.
How to choose a self-tanner shade for vitiligo skin?
Choose a shade based on the appearance you want across the full area, rather than trying to match a patch alone. When using self-tanner to even out vitiligo, a subtle tone may soften contrast without making surrounding skin look unusually dark. If you’re blending a forearm patch, for instance, consider the tone of your whole forearm. Test the shade on a small area and wait for it to develop before expanding coverage.


